In our helpdesk, the term “workflow” refers to the structured movement of requests as they pass from one stakeholder to another. With our dynamic workflow builder, you can customize every step of this process. Whether it’s an approval procedure, resolving an issue, or processing a change, the workflow module allows you to translate these processes into actionable steps. This means you can define stages such as initial request, stakeholder review, approval, and final resolution, tailoring the workflow to fit your specific needs.
Tired of rigid ticketing systems?
Discover how SteadyPoint Helpdesk lets you tailor workflows to your exact needs — without coding.
👉 Book your free demo now and start building smarter processes.
This guide will walk you through the process of customizing the SteadyPoint SharePoint Helpdesk workflow and what you need to know about it.
Table of Contents
Accessing the Workflow builder in SteadyPoint Office 365 Ticketing sysem
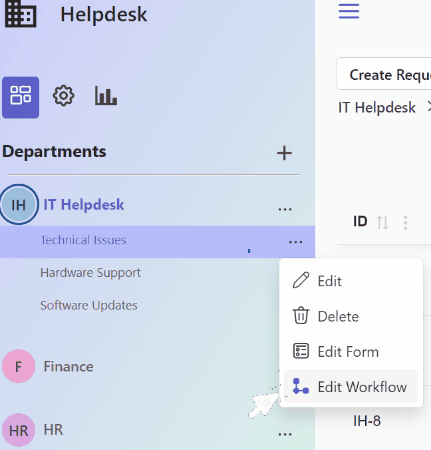
You can access the workflow builder from the Request type, as described below:
- Click on the ellipsis (…) adjacent to the desired request type.
- Choose ‘Edit Workflow‘ from the options.
Default Workflow in SteadyPoint SharePoint Helpdesk
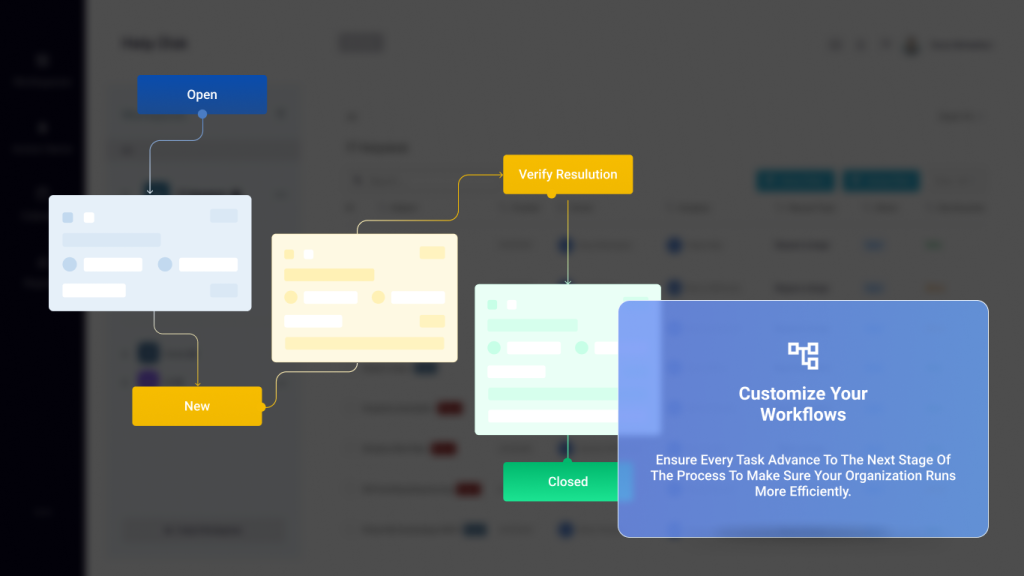
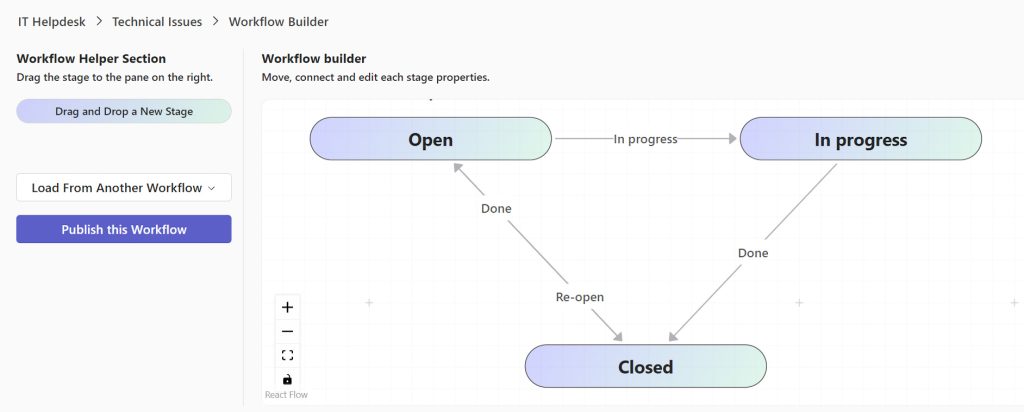
Our SharePoint help desk system comes with a default workflow that consists of three stages: Open, In Progress, and Closed, with the possibility to reopen a closed request. This is depicted in the figure below.

When a new request is created, it is marked as “Open”. At this stage, the assignee can either move it to the “In Progress” stage or directly close it. If a ticket is moved to the “In Progress” stage, the only option allowed is to close it after finishing the work. When a ticket is closed, there is an option to reopen the ticket if needed. The arrows connecting the stages in the figure illustrate the options available to the assignee at each stage.
Several actions can be performed at each stage, which will be discussed later on in the blog.
Customize Workflow in SteadyPoint SharePoint Help Desk
A. Add a New Stage
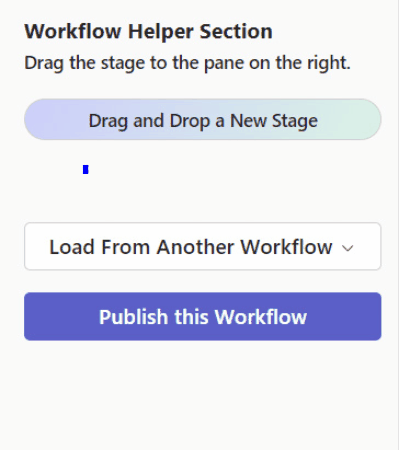
Using the dynamic workflow, you can add an unlimited number of stages by dragging and dropping a stage using the “Drag and Drop a New Stage” option located on the left side of the screen under the Workflow Helper Section.
B. Customize Stage Information
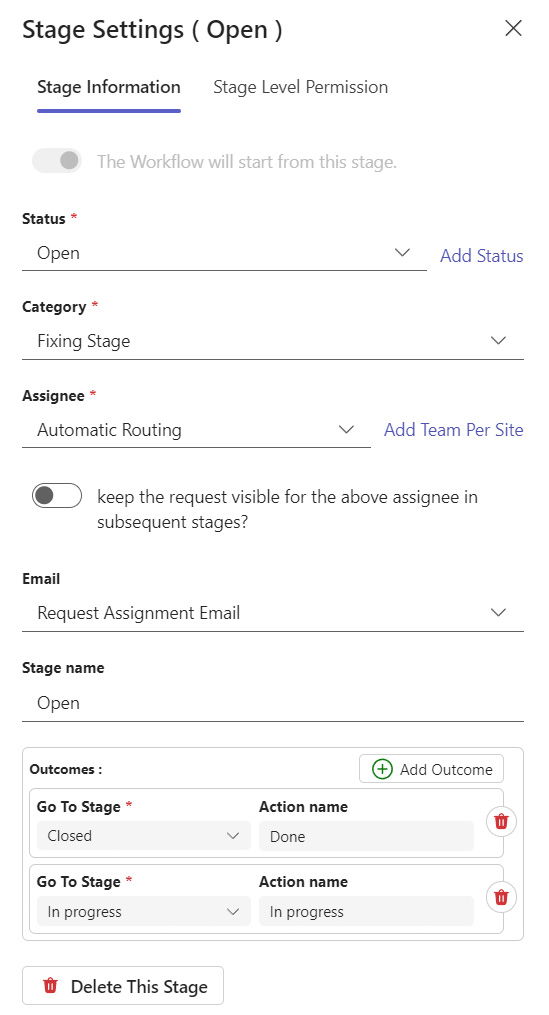
1- Starting Point
The “Make the Workflow Start from This Stage” option is added to the workflow to mark the first stage. It can be enabled or disabled based on the admin’s preferences, but there should be one and only one stage marked as the first stage. In the diagram, a black arrow is used to distinguish the initial stage from other stages in the workflow. By default, the “Open” stage is the first stage, and this option cannot be disabled for this stage unless another stage’s option to be the starting point is enabled.
2- Status
For each stage in the workflow, you can select a status to mark the stage. This status will be utilized in the ticket view as well as in the table summarizing the main ticket information. Users can choose from a list of available statuses, including “Open”, “New”, “Waiting Approval”, among others. Additionally, users have the option to add their own statuses by selecting the “Add Status” option next to the status.
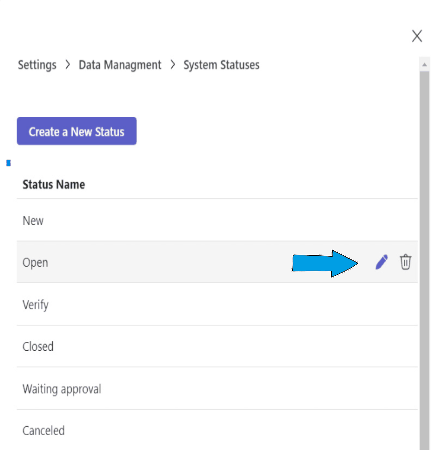
This action opens a new window, shown in the figure above, where admins can input the desired status name. Admins can further manage these statuses by editing or deleting them from the same window.
3- Category
Admins can select the type of stage from three options: Fixing, Transition, and Closure stages.
- Fixing Stage: This stage is characterized by the “handled by” field being populated. For instance, if the category of the Open stage is “Fixing” it implies that the assignee in the Open stage is the person responsible for handling the ticket.
- Transition Stage: This stage serves as a connecting point where no critical actions to resolve the issue are taken.
- Closure Stage: This stage marks the closing stage. This is beneficial for populating the “closed by” field. For example, in the default workflow, if assignee X changes the stage from “Open” or “In Progress” to Closed, where the last is considered a Closure category, this indicates that X is the person who closed the ticket.
4- Assignee
Admins can select the assignee for each stage from a range of options that include:
- Leaving the ticket unassigned.
- Automatic routing: The system automatically assigns tickets based on predefined rules. This can involve assigning tickets to a specific team for each site or, if not specified, assigning tickets to the default assignee of the department.
- Request author.
- Request owner.
- Request handled by: The person who has already handled the request becomes the assignee.
- Request owner’s manager.
- User or group: A specific user or group is assigned to handle the request.
It’s important to note that the “handled by” option will not function in the first stage because, at this point, the field is not yet populated.
5-Request Visibility Across Stages
The feature “Keep the request visible for the above assignee in subsequent stages” can be toggled on or off. When activated, it allows the current assignee in a particular stage to monitor the ticket’s progression through subsequent stages, regardless of reassignments. This functionality is valuable in various scenarios. For example, if the ticket is initially assigned to the IT team during the open stage and then claimed by a specific team member, enabling this option ensures that other team members can consistently track the ticket’s status and progress.
6- Email
Admins have the flexibility to select the email template to be sent to the assignee in each stage from a predefined list of system email templates. Additionally, admins can create their custom email templates.
7- Stage name
8- Outcomes
In the outcomes section, users can add the following stage to specify where the assignee can redirect the ticket next. Adding an outcome to a specific stage will automatically establish a connection between the two stages, with the arrow direction depicting the ticket’s progression from one stage to another. It’s important to note that only a stage categorized as “closure” can be left without an outcome.
C. Customize Stage level Permissions
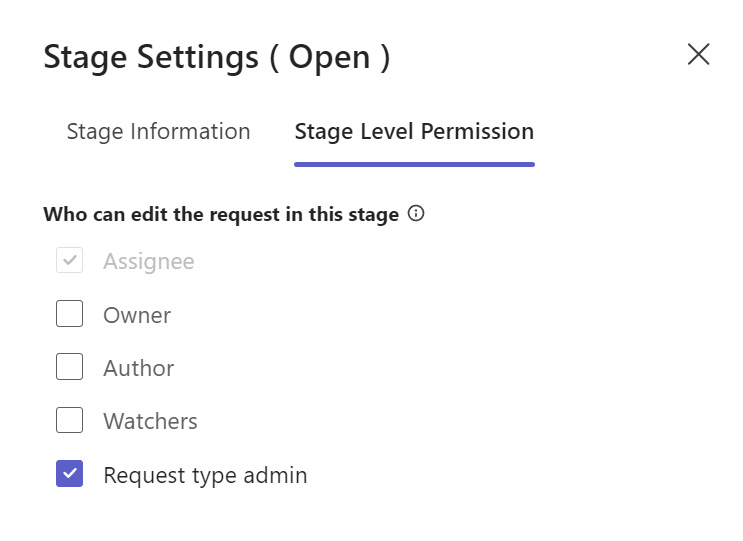
Permissions can be granted per stage for editing fields. The “Who can edit” setting enables the selected individuals to edit the following:
- Fields: Users can edit fields that are editable in the System (Owner, assignee, priority, subject, description, resolution, etc.) or custom form fields.
- Watcher: Users can add or edit the Watcher list.
- Attachments: Users can add and delete attachments.
- Move request to other stages as designed in the Workflow.
Features
This module comes with the following actions:
- Publishing Changes:
Admins can create their own customized workflow and publish changes to all users. It’s crucial to save the changes for them to take effect. The modifications will be visible on newly created tickets after the changes are saved.
- Loading Existing Workflows:
Users can opt not to build a workflow from scratch. Instead, they can reuse an existing workflow or the default workflow and customize it to their needs. Loading can be done from one level to the same level of categorization. In simpler terms, you can load from one request type to another, from one category to another, or from one subcategory to another. However, loading from one request type to another category is not supported.